How do you build something round with LEGO bricks?
How do you build round things from square LEGO bricks, what math tricks are involved and what role does Minecraft play in this?
Round shapes of square stones
LEGO is not a medium that is inherently suited to building round shapes. After all, the basic building block – a 1×1 brick has a square footprint, and a LEGO baseplate has studs arranged in a regular square grid.
And yet there are many beautiful LEGO creations that feature round shapes – all kinds of cylinders and even spheres.
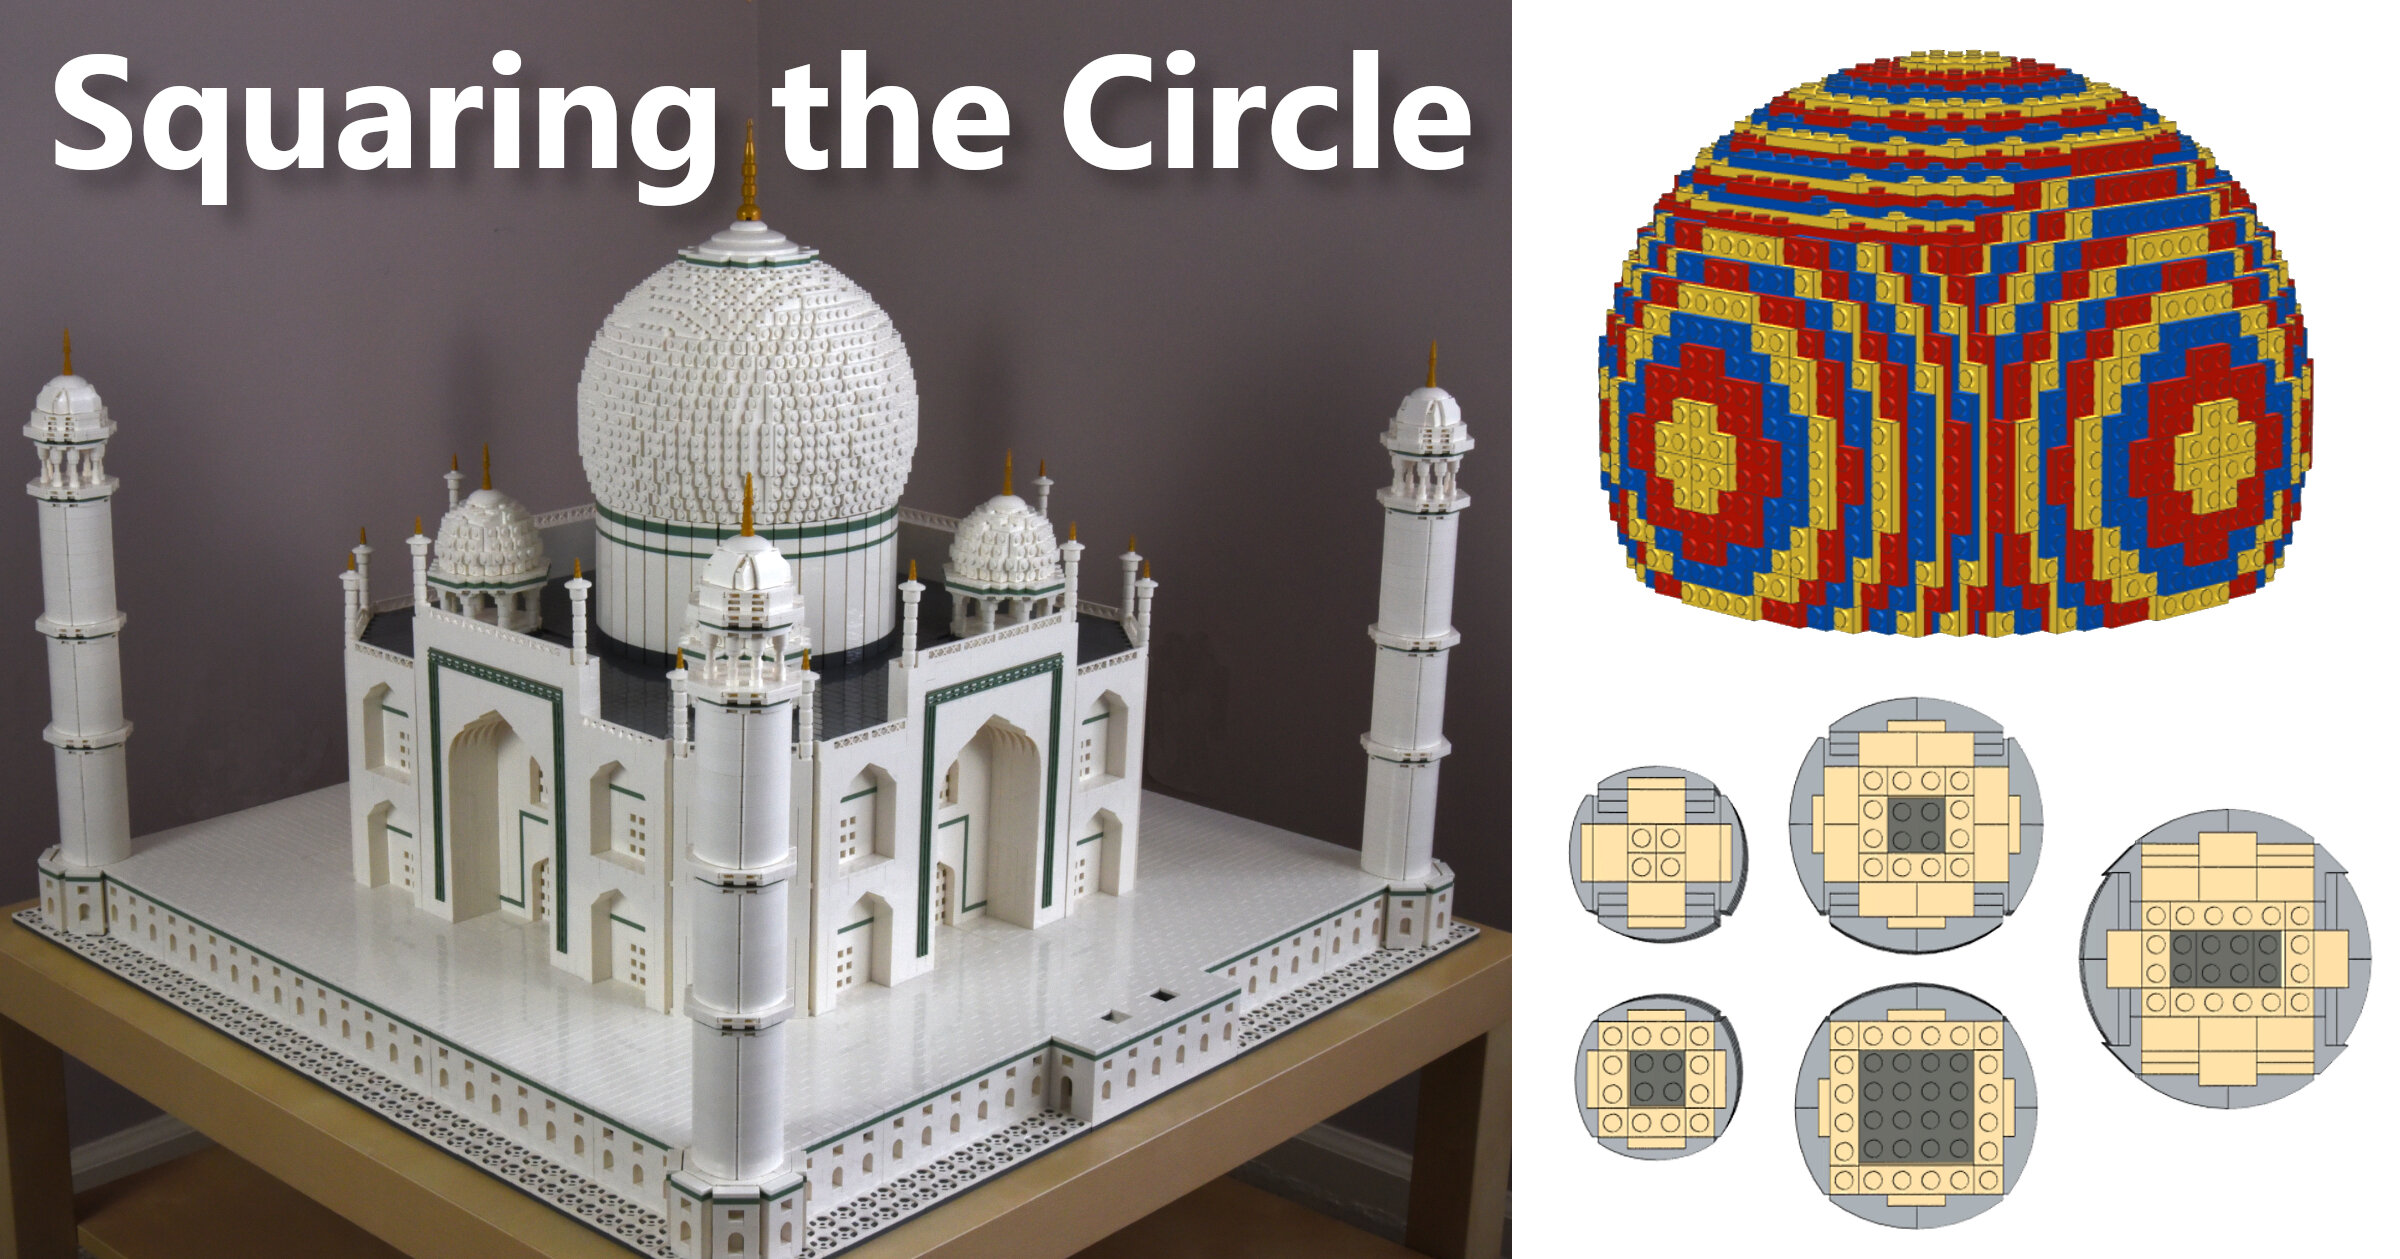
We didn’t have much experience building these shapes out of LEGO until we started working on our own version of the Taj Mahal. The centerpiece of this famous monument (which happens to be one of the modern wonders of the world) is the enormous dome that sits on a cylindrical base called the drum (that’s an actual architectural term!). The minarets (slender towers) that sit on the 4 corners of the Taj Mahal’s base are actually stacked cylinders as well.


Some time ago we came across the model of the Taj Mahal built by the late Arthur Gugick. This amazing model preceded the LEGO Creator Expert 10189 set and became the central prop in an Australian independent film called "Taj" (the story revolves around a father who reconnects with his estranged daughter by building a LEGO model of the Taj Mahal with her).
We knew right away that we wanted to create our own version of the Taj Mahal, but we weren't ready yet. We had a lot to learn before we could do justice to this wonder of the world.
As impressive as Sean Kenney’s model of the Empire State Building was, we didn’t have much trouble intuitively understanding how it was built. A skyscraper like the Empire State Building is essentially a stack of floors: you just build a few variations of the floor design, and then you can repeat them as many times as you need to build the whole thing. Things get more interesting if you build the top of a classic skyscraper (where it tapers to a spire), but you’re still dealing with geometric shapes (with a few notable exceptions, like the crown of the Chrysler Building).
The Taj Mahal, on the other hand, features several organic shapes – arches, minarets and of course domes and I knew nothing about building round shapes with LEGO.

In the years that followed, as we sunk our teeth into building various models of skyscrapers, the Taj Mahal was always in the back of our minds.
In fact, more than once we started a model of the Taj Mahal before giving up because we simply couldn't figure out how to make an arch or some other element in the model work.
We still had to take a deep dive into all the techniques that exist to create round shapes with LEGO – we basically scoured the internet for all the information we could find on the subject. Every step of the way we were amazed and inspired by the endless creativity of the AFOL community (we also used a few tools created by the Minecraft community).

In what is probably a testament to our growth as builders, we were able to breeze through the design of the Taj Mahal this time around. We used all the tricks we had learned from building skyscraper models - SNOT, half stud offsets, angled walls, etc. as well as some of the new tricks we had picked up from our research.
We hope this article can shed some light on the fascinating subject of building round shapes with LEGO. We can't claim to have invented any of the techniques mentioned in this article, but we're happy to catalogue them here for future reference (with credit given to the inventors where possible).
Making the circle square
So what exactly does making round shapes out of LEGO entail? The title of this post refers to “squaring the circle,” an age-old mathematical problem that people tried to solve for centuries until it was proven impossible to solve in 1882. However, it is possible to get close enough by using an approximation of the number π (pi).
In much the same way, all of the techniques described here attempt to use square/rectangular stones or slabs to create the best possible approximation of the round shape.
The result is never perfect, and the limitations of the LEGO medium will always be visible in the jaggedness of the curves and gaps that you can see, especially when you look at your model up close. But the trick is to create a fairly convincing illusion of a round shape, at least when you look at your model from a few steps back.
1) Using SNOT to make small cylinders
For the minarets of the Taj Mahal, we didn’t want to be limited by the small selection of cylinder pieces that LEGO has. We wanted to try a different way of building cylinders that could be scaled to any desired height. We were already familiar with using curved ramps and SNOT to create round shapes (we had used this technique to build the crown on our Chrysler Building model). The same technique can be used to create cylinders of different diameters. All of the cylinders in the image below can be built in two-stud height intervals.


2) LEGO walls bend to create round shapes
A “brute force” way to build round walls with LEGO is to build straight walls and then bend them to form a circle. The longer your wall, the more flexibility it will have, making it easier to bend into a complete circle. The number of 1×2 bricks needed in each layer to build a stable round wall is typically around 72, plus or minus a few bricks. However, we have seen round walls built with far fewer slabs in each layer.
Check out the work of Jeff Sanders who specializes in "brick bending". He has an impressive portfolio of creations made by bending LEGO brick walls not only into circles, but into various other shapes.
Please note that most brick bending techniques are strictly speaking "illegal", as you are using LEGO elements in ways they were not intended for and exposing them to unnecessary stress and potential damage. One obvious disadvantage to this technique (besides being illegal) is the fact that it cannot be digitally replicated in BrickLink's Stud.io software.
A few years ago we started a LEGO project that was unlike any other we had ever worked on. We wanted to make a round shape out of a studded mosaic. We came up with our own pattern of intertwined snakes and used a little over 14,000 plates to build this round thing that we like to think of as a vase (because a trash can is not very appealing). This sits in a corner of our basement somewhere because we still haven't figured out a good way to finish it and make it into something worth showing off. Suggestions are of course welcome!


3) Mixing Regular Bricks with Round 1×1 Bricks
This technique uses the same approach as above – except for the fact that we use 1×1 round bricks (or plates) in our wall to allow it to be more readily (and legally!). If we alternate 1×3 bricks in our wall (1×2 bricks also work) with 1×1 round bricks, the round bricks act like hinges to some extent, allowing the wall to be bent to form a circle. This method allows round walls to be built with smaller diameters than is possible with the previous method.
The only downside is that the texture of the wall is uneven due to the 1×1 round bricks. It is possible to use tiles to hide the round bricks and create the effect of a real brick wall (credit goes to Steve DeCraemer on Flickr ). The 1×3 bricks here are replaced with 3 headlight bricks with their top studs facing out. These headlight bricks are joined together with 1×3 plates while 1×4 tiles are attached to the face of the round wall creating the look of a brick wall (which should work great for castle builds).


4) Round Walls Using Hinge Bricks and Plates
We have seen that hinge pieces can be very useful for creating angled walls and various polygons (hexagons, octagons, etc). The greater the number of sides in a regular polygon (one where all sides have the same length), the closer it starts to approximate a circle. We can take advantage of this fact to use hinge pieces to create round walls.
One tutorial I came across on this topic was by Eggy Pop on Flickr . I have re-created the round wall shown in this tutorial in Stud.io using 14 1×4 hinge plates to complete the circle (which is essentially a polygon with 28 two-stud wide sides). One of the neat things about this particular round wall is that its diameter (18 studs on the inside, 20 studs on the outside) is a whole number in terms of studs. As you can see, the hinge plates on 4 sides line up with the LEGO grid allowing the round wall to be attached firmly to a base.
So what is special about the number 18? Let us see if we can use some math to figure that out. Assuming the inside of the wall is close enough to a circle, its circumference would be the diameter times π (pi) = 18 x 3.14 = 56.52 studs. Now divide that by 4 (the length of a 1×4 hinge plate) and you get 14.13 which is close enough (for practical purposes) to a whole number 14 – which happens to be the number of hinge plates we used.


Don't count on the same working for round walls with inner diameters of say 17 or 19 studs. What are some other numbers that work? The two numbers closest to 18 that work are 14 and 23 (I used 23 for the drum in my Taj Mahal). As you can see from the pictures, these two numbers don't work as well as 18 and the hinge plates on only 2 sides line up with the LEGO grid (which is usually good enough).
Can we explain why? In the case of 14, the number of hinge plates needed is (14 x 3.14) / 4 which is approximately 11. Since the number of hinge plates is not an even number, you don't have the hinge plates lining up with the LEGO grid on all 4 sides. In the case of 23, the diameter itself is not even. And so, if you line up the hinge plates with the grid on one axis, the other axis is offset by half a stud (you could use jumper plates to attach the round wall to the base on the other two sides if needed).


One issue with round walls is that when you have just 2 or 4 connection points to the base, the rest of the hinge plates are free to move and so the round shape can easily get distorted. There is no elegant solution I could think of to get the wall to maintain its shape (I guess you could use long plates as cross members joining each side of the polygon to the one on the opposite side and then have these cross members attached in the middle using turntables).
For now, I just built a regular inner wall as close as possible to the round wall and attached cheese slopes, curved slopes, etc. to the inner wall using SNOT to fill the gaps the best I could. Since the drum has an outer diameter of 25 studs and I needed to center it on a 24×24 base, I ended up using jumper plates. I also needed jumper plates to center the dome (which is built with a core that is 16×16 studs) on the top of the drum.
While it is quite straightforward to build these round walls using real pieces, how do you do it in Stud.io? The hinge tool allows you to select a piece and rotate it around a hinge point. In this case, the piece being selected would be one-half of the 1×4 hinge plate. When you click on the piece with the hinge tool enabled, you will first see a blue arrow. You can click and drag this blue arrow to manually rotate the piece. Or you can click on the blue arrow to get a white text box where you can enter the precise angle to rotate the piece by.


With round walls it is important to make sure all the hinge plates are rotated by just the right amount or the two ends of the wall will not line up correctly to allow you to complete the circle. To figure out the right angle to use, just divide 360 by the number of sides of the polygon you are building which in the case of the first circle (18 studs diameter) would be the number of hinge plates times 2 = 14 x 2 = 28. 360 divided by 28 is 12.85 degrees which is the number you need to enter in the text box. I tend to apply this rotation to one hinge plate and then copy and paste the hinge assembly (both halves together) as many times as I need.


5) Building Spheres by Stacking Regular Bricks or Plates
To understand how spheres are built using LEGO bricks, I have found it useful to first look at the world of Minecraft. There are some parallels between Minecraft and LEGO in that both use building blocks with square footprints that are placed on a square grid. One important difference is that the blocks in Minecraft are perfect cubes while a basic 1×1 LEGO brick is not (it is taller than it is wide). More on that later. Anyway, there are a number of resources available in the Minecraft community for building spheres and other shapes using Minecraft blocks, and I was wondering if I could leverage some of them for building LEGO spheres.
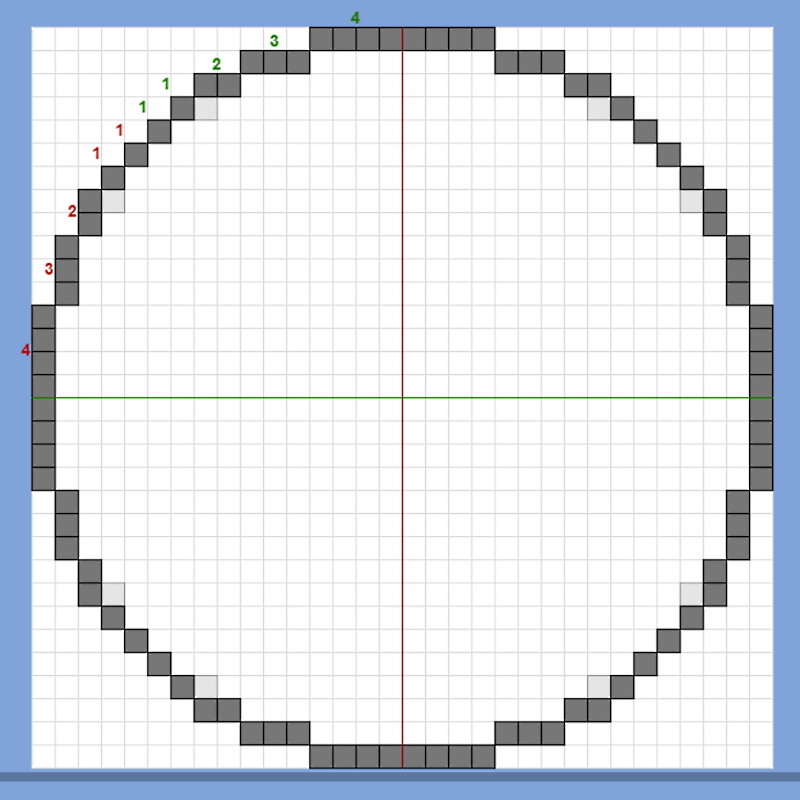
Before we look at a 3-dimensional sphere, let us look at a basic circle in 2 dimensions. Minecraft enthusiasts often use what is known as a circle chart. It shows the placement of blocks (or pixels) in a square grid that best approximates a circle. The chart shows circles with different diameters and as you can see from the chart, the bigger the diameter, the more convincing the illusion of the round shape is.

Minecraft circle chart
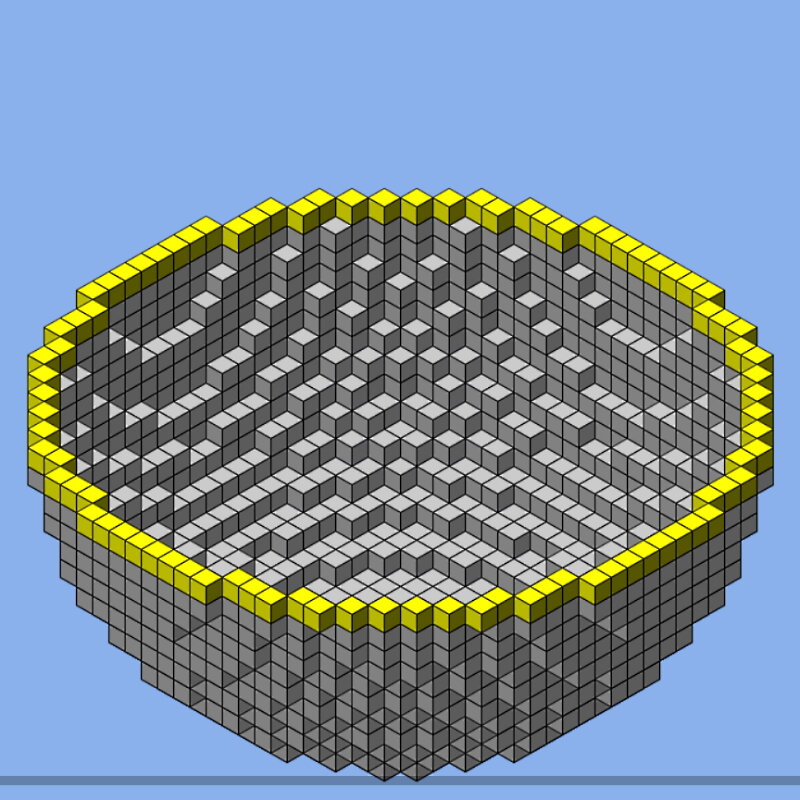
In the Minecraft world where the building blocks are perfect cubes, you can also look at one of the circles and think of it as the side view of a sphere. You can think of each row in the chart as one of the layers of blocks in the sphere you are building. So you would essentially start with a layer of blocks placed in a circle having the diameter of the sphere you want to build (that would be the biggest circle you need). You would then stack layers with successively smaller circles (as you go up) until you reach the smallest circle you need. Repeat the same on the bottom (with the circles getting smaller as you go down) and you have a complete sphere.
Of course, it could be a lot of work to figure all this out by hand (even with the help of a circle chart). Thankfully, an online tool ( Plotz Sphere Generator ) can automate this process for you. You just enter the diameter you need and presto, a sphere is generated for you (with 3D and 2D views showing how the sphere is constructed layer by layer).
That sounds simple – right? Unfortunately, there is a lot more work involved if you want to build this sphere using LEGO bricks. For one, the sphere generator just shows blocks that are equivalent to 1×1 LEGO bricks but you know these bricks just can't be stacked the way you see in the 3D view. You need to convert the 1x1s into longer bricks that form an interlocked structure that holds together well.
You also need to make the walls of the sphere at least 2 studs deep, allowing each successive layer (which is a smaller circle as you move away from the middle layer) to rest on the layer immediately below it. There is one last hitch – if you replace all the blocks in the Minecraft sphere with 1×1 LEGO bricks you will not end up with a perfect sphere. Your sphere will be a little taller than it is wide – just like a 1×1 brick. Thankfully there is also a Plotz Ellipsoid Generator available on the same site and you can use that and compensate for the shape of a 1×1 brick.
For the sphere I built using LEGO bricks, I used Plotz to create an ellipsoid with a width and depth of 36 units and a height of 30 units. Why did I pick a shape that is a little squat compared to a perfect sphere? Notice that the ratio of height to width of the ellipsoid is 5/6 which is the inverse of the proportions of a 1×1 LEGO brick (which has a height to width ratio of 6/5). And so when we use LEGO bricks that are taller than they are wide, the proportions even out and we end up with a perfect sphere.

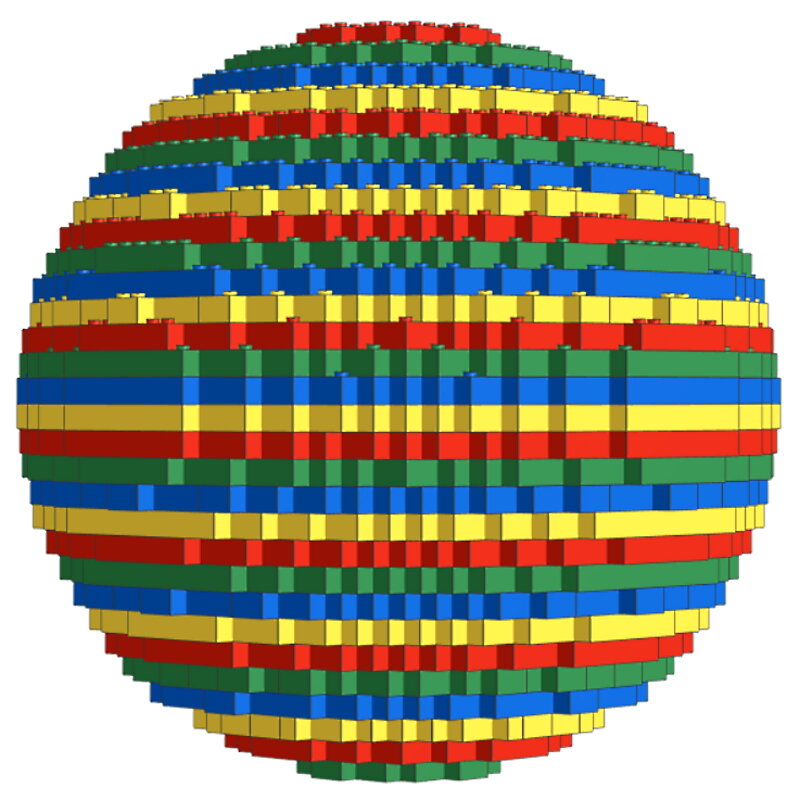
The sphere looks good but it is a little blocky. Is there a way to smooth the curves – perhaps by using LEGO plates which are 1/3rd as tall as bricks? We go back to the Plotz Ellipsoid Generator and this time the numbers we use to reflect the shape of a 1×1 LEGO plate with a height to width ratio of 2/5. I used a height of 50 units and a width of 20 units which gives us a height to width ratio of 5/2. This way when we replace the Minecraft blocks with 1×1 LEGO plates (combined into longer plates as needed) we get a perfect sphere.
Looking at this sphere from the side, we can see a definite improvement compared to the earlier sphere. The curves are much smoother thanks to the smaller gradations achieved by using plates instead of bricks. But the limitations of this approach are quite apparent when you turn the sphere and look at it from the top. From this view, the curves once again appear blocky. As it turns out, using plates to build the sphere only makes the curves smoother in one of the three dimensions. Another downside to spheres built by stacking bricks or plates is that the undersides of the bricks and plates are visible when you look at the bottom side of the sphere.


Is there a way to achieve smoother curves in all 3 dimensions without any of those pesky undersides of plates being visible? If we could take just the top part of this sphere that is smoother and somehow use it in all 3 dimensions (all 6 sides), we would have a sphere that looks smooth all-around – correct? That is exactly the idea that AFOL extraordinaire Bruce Lowell had back in 2002. His invention sort of revolutionized the construction of round shapes (not just spheres) using LEGO, earning him the distinction of being the only AFOL (I know of) to have a building technique named after him – the Lowell Sphere!
6) Lowell Spheres
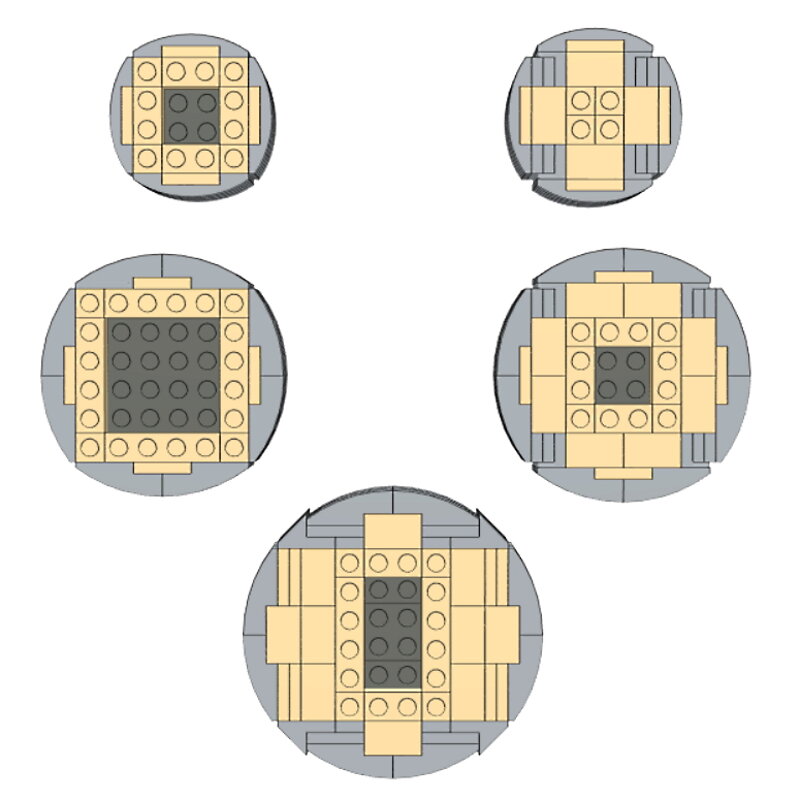
The final technique I'll share today is the Lowell Sphere. This consists of a SNOT cube (with studs in all directions) with 6 identical curved panels (built using LEGO plates) attached on all 6 sides. Each panel is longer than it is wide allowing the 6 panels to interlock perfectly without any visible gaps. Bruce Lowell's original sphere had a diameter of 6.8 studs and it had an inner core that was 4x4x4 studs wide. But in the years that followed, this technique has taken on a life of its own, finding applications in not just spheres but other complex sculptures as well.

Image via LEGO Ideas
While the original 6.8-stud wide sphere is pretty easy to figure out, how do you apply this technique to build bigger spheres? Another AFOL who has been key to making this technique accessible to everyone is Bram Lambrecht . He developed Bram's Sphere Generator which allows you to create a Lowell Sphere with any diameter that you need. Just enter the diameter (in increments of 0.2 studs), tweak a few settings and you are ready to save a Ldraw file that can be imported into Stud.io. There is an option to use half-stud offsets (jumper plates) to get more detail but I have not found that to be practical for larger spheres.
One very useful setting is “use alternating layer colors” and with this selected, different colors are used for the layers of plates that make up each of the 6 identical panels. You may wonder why that is useful. The Ldraw file has sub-models for the 6 panels. But when you release (ungroup) one of these sub-models, you will see that each panel is built entirely out of 1×1 plates. So there is some work involved here, going layer by layer and replacing the 1×1 plates with bigger ones.
You have to pick the plates in such a way that the entire panel holds together as one unit (by ensuring that the seams between plates don't line up between successive layers). The good news is that once you have worked on one panel, you can save it back as a sub-model and use that for all 6 sides. The Ldraw file also doesn't include the core and so you will have to build that as a SNOT cube with studs in all 6 directions (just a handful of connection points for each of the 6 panels is usually sufficient).

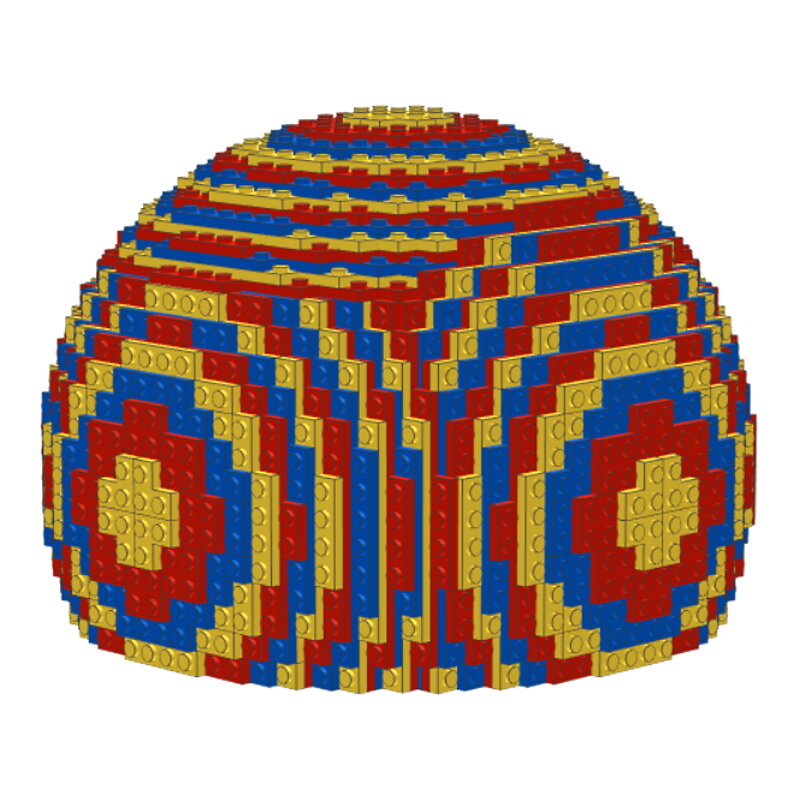
For the rounded dome of the Taj Mahal, I created a Lowell Sphere with a diameter of 27.2 studs. This is made up of a core that measures 16x16x16 studs and 6 curved panels that are each 14 plates thick (so the diameter is 16 studs + 28 plates which is equivalent to 16 + 11.2 = 27.2 studs). Clearly, I didn't need the bottom part of the sphere and so I had to truncate it. I ended up removing the bottom panel of the sphere entirely and reducing the height of the core by 2 studs to 14 studs.
I also had to crop the bottom portions of the curved panels on the 4 sides (since the panels are oriented two different ways, I had to create two variants of the cropped side panels). The bottom portion of the dome which sits on the drum ended up having a diameter of 16 studs + 22 plates = 24.8 studs which was very close to the outer diameter of the drum (25 studs).


The concept of the Lowell Sphere can be extended to other shapes. Lsculpt also developed by Bram Lambrecht, allows you to convert a 3D model into a LEGO sculpture that is structured much like a Lowell Sphere with a SNOT core (that is not necessarily a cube) that has curved panels attached in all 3 dimensions. Here's a heart sculpture that I built digitally using Lsculpt.


Rounding Things Off
The techniques I have listed are just the tip of the iceberg, so to speak. There are several other ingenious techniques that people have come up with, to build round shapes using LEGO. Hopefully this article can give you a good jumping-off point for your own exploration of these techniques (on Flickr and other sites). Please feel free to add comments about any particular technique that is your favorite (even if I have not covered it here).
-

Investing in LEGO... interesting or better not? (part 1)
READ MORE -

The LEGO Group calls on suppliers to aim for zero emissions
READ MORE -

Waarom heeft deze LEGO set 1138 Steentjes?
LEES MEER -

LEGO Fortnite Samurai Darth Vader???
LEES MEER -

-

Komt er een LEGO Snoopy
LEES MEER -

Drijvende zee otter
LEES MEER -

Komt er een LEGO set van Kuifje?
LEES MEER -

Fan van Downton Abbey? bouw het kasteel
LEES MEER


LATEST LEGO SETS
-
 In offerta
LEGO 3-in-1 dieren op wielen 10448 DUPLO
Prezzo di listino £27.00 GBPPrezzo di listino£31.00 GBPPrezzo scontato £27.00 GBPIn offerta -

 In offerta
LEGO Hopsy's kasteelspel 10450 DUPLO
Prezzo di listino £30.00 GBPPrezzo di listino£35.00 GBPPrezzo scontato £30.00 GBPIn offerta -
LEGO McQueens bezoek aan Docs garage 10456 DUPLO
Prezzo di listino £23.00 GBPPrezzo di listino£27.00 GBPPrezzo scontato £23.00 GBPIn offerta -
LEGO De tuin en kas van Opa Big 10461 Peppa Pig
Prezzo di listino £60.00 GBPPrezzo di listino£70.00 GBPPrezzo scontato £60.00 GBPIn offerta -
LEGO Minnie's huisdierenhotel 43274 Disney
Prezzo di listino £30.00 GBPPrezzo di listino -
LEGO Centraal Station 60469 City
Prezzo di listino £68.00 GBPPrezzo di listino -
LEGO Arctic Explorer Polar Express Trein 60470 City
Prezzo di listino £149.00 GBPPrezzo di listino -
LEGO Nachtmerrie haaienonderzeeër 71500 Dreamzzz
Prezzo di listino £110.00 GBPPrezzo di listino -
LEGO Arins Spinjitzu strijdmecha 71839 Ninjago
Prezzo di listino £16.00 GBPPrezzo di listino -
LEGO Rontu de Meesterdraak 71842 Ninjago
Prezzo di listino £35.00 GBPPrezzo di listino


SELECTED FOR YOU
-
LEGO 21062 (Pre-Order: March 2025)
Prezzo di listino £119.00 GBPPrezzo di listino -
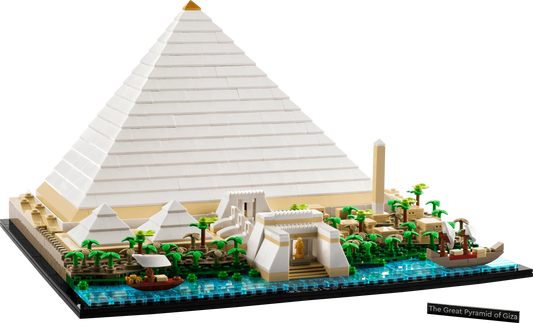
LEGO Pyramid of Giza 21058 Architecture
Prezzo di listino £104.00 GBPPrezzo di listino -
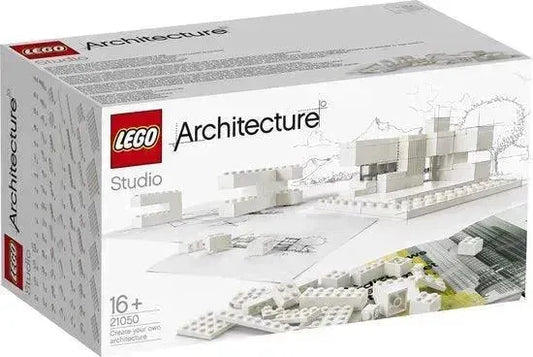
LEGO Build your own Architecture buildings with this set Studio 21050 Architecture
Prezzo di listino £393.00 GBPPrezzo di listino -
LEGO Statue of Liberty 21042 Architecture
Prezzo di listino £75.00 GBPPrezzo di listino -
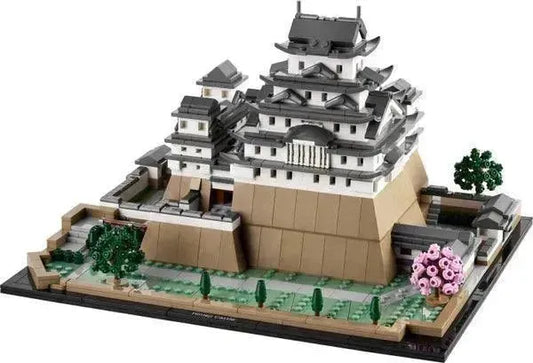
LEGO Himeji Castle 21060 Architecture
Prezzo di listino £119.00 GBPPrezzo di listino -
LEGO Architecture New York City – The Big Apple Bouwpakket voor Volwassenen met Bezienswaardigheden incl. Empire State Building en Brooklyn Bridge - Woondecoratie of Kantoor Decoratie - Cadeau 21066
Prezzo di listino £110.00 GBPPrezzo di listino£123.00 GBPPrezzo scontato £110.00 GBPIn offerta


-

LEGO Avatar
LEGO Avatar: Dive into the wonderful world of Pandora! Build with Jake...
-

LEGO Icons
Relive your childhood with LEGO Icons sets, specially designed for nostalgic adults....
-

LEGO Classic
Discover endless building fun with LEGO Classic sets! This collection offers a...
